Moscow’s news reports fall into three categories: “true,” “probably true,” and “untrue.” The first category includes the time signals, the second the weather forecasts, and the third everything else. — Anekdot
Recent articles
-
Look How Much They've Grown!
2026-01-07
<img src="https://res.cloudinary.com/pravda/image/upload/v1767700095/img_20260106_204001_sxsgoz.jpg" alt="Hydroponic setup as of January 2026" width="600" /> I started hydroponic gardening! You can check out the progress [here](https://zhivaya.dev/). You can see photos from the beginning up to now. Source code is available [here](https://github.com/kirisaki/zhivaya). ## The Beginning I asked an LLM "Got any cool IoT project ideas?" and hydroponics was one of the suggestions—it caught my interest. However, my apartment has poor natural lighting and I couldn't secure the space, so the idea sat on the back burner for a while. But after a major cleaning effort, I managed to free up the space where my bookshelf used to be, and thus my hydroponic journey began. ## Seed Sowing and Transplanting I started at the end of November, just as Japan was heading into winter. My apartment is reinforced concrete and semi-basement, so it retains heat well and doesn't experience much temperature fluctuation. Figuring it was around 15°C, I consulted with Gemini, which recommended the following varieties: - Italian Parsley - Swiss Chard - Leaf Lettuce - Arugula - Cilantro I bought the seeds as suggested and planted them as shown below. <img src="https://res.cloudinary.com/pravda/image/upload/v1767702789/IMG20251203151226_cpbi0e.jpg" alt="Seed sowing setup" width="600" /> I filled containers with water, placed moistened sponges with slits cut into them, and sowed the seeds on top. The aluminum foil was because Gemini said those seeds were photoblastic (light-sensitive for germination)... but when I looked it up, I couldn't really tell either way, and it worked fine even after removing it. I placed them in the warm bedroom on top of my PC with LED light for germination. Once sprouted, they wait for growth under stronger plant-growing LEDs. <img src="https://res.cloudinary.com/pravda/image/upload/v1767702789/IMG20251206142305_rm8pgh.jpg" alt="Seeds waiting to grow under LED" width="600" /> <img src="https://res.cloudinary.com/pravda/image/upload/v1767702790/IMG20251220222948_sqchci.jpg" alt="Seeds after initial growth phase" width="600" /> According to Gemini, I should transplant after the true leaves appear, but it had already been 20 days since sowing, so I decided to move on to transplanting. Transplanting is the process of planting seedlings into planters or similar containers. For this hydroponic setup, I made specialized cups, lined them with hydro balls, and buried the seedling sponges in them. The cups were 3D printed. <img src="https://res.cloudinary.com/pravda/image/upload/v1767702789/IMG20251205125927_d2rwa2.jpg" alt="3D printed hydroponic cups" width="600" /> Then I cut holes in a styrofoam board and installed the transplanted cups, and it looks like this: <img src="https://res.cloudinary.com/pravda/image/upload/v1767702790/IMG20251221132926_y2aqbx.jpg" alt="Transplanted seedlings" width="600" /> From here, just turning the LEDs on and off will make them grow. But of course, we need to automate this! ## Automation ### Temperature and Humidity Monitoring First, I set up temperature and humidity monitoring. I used the M5NanoC6, a tiny device from the M5Stack series with an ESP32-C6. Despite being small, it supports Wi-Fi and Bluetooth, comes with USB Type-C and a GROVE connector, making it quite versatile. It also has buttons, RGB LED, and even an IR LED. I connected an ENV-IV unit with an SHT40 temperature and humidity sensor to it. (Apparently it's been discontinued.) The NanoC6 distributes the sensor values via a Web API. I quickly coded it up with Claude Code. Haven't uploaded it to GitHub though... need it? ### Lighting Control Next, the lighting. My LED lights had no control features, so I built that too. Again used NanoC6 for the controller. For LED ON-OFF, I used a MOSFET relay with a GROVE connector from Seeed. (Unfortunately seems to be discontinued too.) It connects to GROVE but doesn't speak I2C, so note that. It closes when the GPIO input is ON. The control program syncs time via Wi-Fi with SNTP and simply turns ON-OFF when the time comes. I also added a Web API to get the switch state and a feature to light the LED in different colors depending on the state. The whole system looks like this: <img src="https://res.cloudinary.com/pravda/image/upload/v1767702791/IMG20251225142703_hsvl9c.jpg" alt="Full hydroponic system view" width="600" /> Though you can't really see much because the controller is so small. That's another advantage of the NanoC6—how compact it can be. With this, I confirmed the temperature and humidity are around 15°C / 50%, optimal for hydroponics, and the lighting is automated so it's safe to leave the house. ## Image Streaming I want to do time-lapse observation of plant growth! So I quickly put together a system. Initially I thought about streaming live video, but decided against it—what's the point of streaming plants that barely move? ### Hardware Here's what I used: - Raspberry Pi 4 - USB Type-C power supply - Camera Module 2 - Cardboard box for mounting All of this was lying around at home. Assembled, it looks like this: <img src="https://res.cloudinary.com/pravda/image/upload/v1767702789/IMG20260106213024_ozveic.jpg" alt="Raspberry Pi 4 crudely mounted on a box" width="600" /> Ah yes, DIY! ### Software & Distribution The Raspberry Pi 4 is controlled simply with a combination of shell scripts and cron. The source is in the `/rpi` directory of the repository. It's a script that takes still photos and uploads them to Cloudflare R2, but it also temporarily saves temperature and humidity data in SQLite3, converts it to JSON, and sends it to R2. I'm managing it in a DB for now, thinking I might need to extract specific data later. I considered InfluxDB since it's time-series data, but decided against it due to operational overhead. The JSON uploaded to R2 contains filenames and temperature/humidity data. This is fetched and displayed by a frontend built with Astro. Like a time-lapse, you can move a slider to see past images and temperature/humidity. It fetches images each time, so it's not smooth though. ## Reflections and Future Plans For something I made on the side, I think it turned out to be a pretty good system. I could have left all the control to just the Raspberry Pi, but decided against it for these reasons: - Wiring would become messy - By keeping the lighting system separate, cultivation can continue even if the image streaming system stops Future plans are as follows: ### Give the Raspberry Pi a Proper Stand Having it just plopped on a cardboard box with a camera attached is obviously inconvenient, so I want to make a case for the camera module and Raspberry Pi and mount it on a tripod or something. ### Time-lapse Video Distribution I've already written a script that can create time-lapse videos, but I haven't set up distribution on the website yet, so I want to make that happen. ### Add Aeration Since the plants hadn't grown much when I automated the system, I omitted aeration (the thing that bubbles air in the water). I've already bought the equipment, so I'll install it. ## Conclusion It looks like it'll take another 20 days or so until harvest. I'm looking forward to it. Maybe I'll make a salad or something.
-
Ray Tracing That Was Anything *But* a Weekend — in Forth
2025-10-10
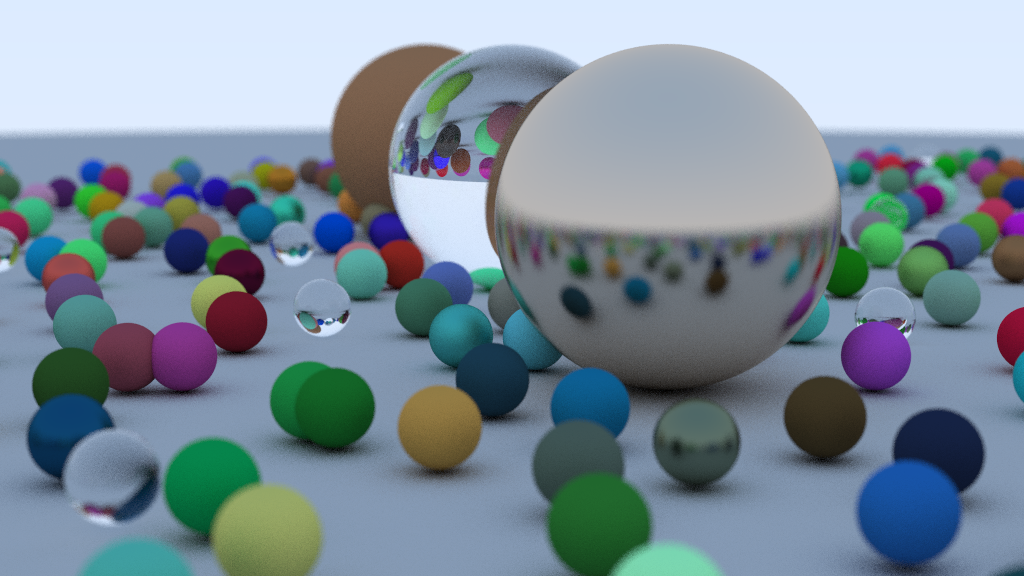 ## Result [kirisaki/forth-raytracing: An implementation of ray tracing in Forth.](https://github.com/kirisaki/forth-raytracing) ## The Beginning There’s a well-known challenge called [*Ray Tracing in One Weekend*](https://raytracing.github.io/). The idea is simple — write a minimal ray tracer over a weekend. I once implemented it in [Rust](https://github.com/kirisaki/rust-raytracing). This time, I decided to try it in **Forth**. *Am I insane?* ## Why It’s Madness Writing a “weekend ray tracer” in Forth is borderline insanity. - There’s no garbage collector - No concept of ownership - You manipulate raw memory directly - There are no variables - Well, kind of, but they’re very peculiar - In gforth, there are literally none for floating-point numbers - ~~No namespaces~~ There are wordlists after all (added on 2025-10-11) - No types - You push values onto a stack, call a word (Forth’s term for a function), and push the result back onto the stack - Naturally, stack underflows and overflows happen all the time It’s a parade of “no”s. With no compile-time checks, it’s even harsher than C. Maybe slightly better than assembly. So why write in such a language? *Because the stack was there.* ## Still, It Works If You’re Patient Forth is quirky, but once you understand how it works, it’s not too bad. For example, here’s how you’d generate random numbers — since there’s no standard library, you have to write your own. ```forth \ Generate a random number : rand ( u -- u u ) \ Xorshift64 PRNG dup 0= if drop 1 then dup 12 rshift xor dup 25 lshift xor dup 27 rshift xor 2685821657736338717 * ; ```` The `( u -- u u )` part is just a comment. It means: “Given one unsigned integer, return two unsigned integers.” It’s purely descriptive — there’s no enforcement — but if you test carefully, it works fine. You can also use variables. ```forth \ Create a new ray : ray-new ( origin direction pool -- ray-addr ) locals| p d o | p pool-alloc dup r-origin o swap vec3-move dup r-direction d swap vec3-move ; ``` `locals| ... |` declares local variables *in the order they’re popped from the stack*. So they’re bound in the **reverse order** of the comment. This causes frequent bugs. Also, gforth’s floating-point stack doesn’t support `locals| ... |`, so you have to mentally trace every stack operation yourself. Once you understand these nuances — and memory management — you can get by. I thought I’d be done by the weekend. ## Leak, Leak, Leak “*Let the OS handle memory management*,” I thought. After all, it’s a one-shot program, not a long-running server. The result? **300 MB of memory leaks per second.** Even with 128 GB of RAM, it was gone in no time. The final challenge — rendering a scene full of spheres — couldn’t even finish. Thus began the hell of leak hunting. But the leaks refused to die. At last, I made a decision: — *Start over, and implement proper memory management.* ## Bringing Order to Chaos Even if I rewrote it, calling `malloc (allocate)` and `free` constantly didn’t seem ideal. I asked ChatGPT for advice — it confirmed the performance concern — and suggested using an **arena allocator**. The idea is simple: allocate a large memory region (the arena), then manage memory manually with custom `allocate` and `free`. I also introduced a **memory pool**. In the arena, memory is simply allocated sequentially, wasting unused space. The pool, on the other hand, manages fixed-size chunks in a linked list, reusing freed blocks efficiently. After about a week of rewriting with arenas and pools, I finally generated the image above. **Victory was mine.** ## Remaining Challenges It worked — but not without issues. ### It’s Slow Rendering the 1024×576 image took **four hours**. There’s zero optimization — the code runs exactly as written. Naïve implementations take time. Lots of it. ### Inconsistent Calling Conventions Because I designed everything ad hoc, the argument order is inconsistent across functions. While not unique to Forth, this is especially painful here: Forth calls words based on the *stack order*, so changing call order later is a nightmare. Also, passing four different memory pools around is ridiculous — I should’ve just made a struct. ## Conclusion Writing Forth was painful — but also deeply enjoyable. It gave me the same low-level control as C, with a Lisp-like expressiveness. If you’re curious, give it a try. It’s worth it.